
Boltguns &
Brushstrokes- Dark Angels Space Marines
Howdy Trukkers!
The last few weeks, the internet has been absolutely awash
in discussion about those most enigmatic Space Marines, the Dark Angels. While
nobody can say for sure what to expect from their upcoming Codex (and perhaps,
that’s fitting!) there’s been plenty of sudden interest in the Unforgiven.
So this week, in Boltguns & Brushstrokes, I’m going to
walk you all through painting a Dark Angels Space Marine. We’ll use the
techniques found in both the How to Paint Faces article (http://ritesofbattle.blogspot.com/2012/10/boltguns-brushstrokes-painting-faces.html) and How to Paint
Cloth article (http://ritesofbattle.blogspot.com/2012/10/boltguns-brushstrokes-painting-cloth.html), as well as simple layering and washing to bring out a
rich, hunter green on the armor.
To start, after undercoating the model with a black spray primer, I apply a layer of Reaper Master Series (RMS) Forest Green.

I then wash this with Games Workshop (GW) Nuln Oil. This
brings the model almost back to black, but gives us the darkest green color in
the recesses to create the majority of the shading for the armor later.

When that’s dry, I then apply a layer of RMS Brilliant
Green, which is a strong mid-tone green. I apply it everywhere on the armor
except in the deepest recesses, leaving the dark green transition to black from
the previous steps.

I then wash the model with Nuln Oil again. This gives us a
gradient effect on the green armor without doing any blending work. It’s a
quirk of dark green paints that black washes create a blended effect—perhaps
because they’re close enough to black to begin. I’m not really sure. I do know
that because of this, Dark Angels are some of the fastest Space Marines to
paint to a high standard!

While I waited for the second wash to dry, I went ahead and
applied a basecoat of GW Khorne Red to the trim on the shoulder pads and casing
on the weapons. If you prefer to finish the armor completely before moving on
to the rest of the model, just skip this step and come back to it after the
next step.

Our final layer on the armor is a 90-10 mix of RMS Brilliant
Green and Mint Green. Mint Green is a very light green, and just a tiny bit
will drastically lighten the Brilliant Green. I apply this as a sharp edge
highlight to define the armor plates. Be sure to put a line across the toe of
the boots and pick out the fingers on the gauntlets with this step—the
extremities seem to be the most noticeable places for highlights on Space
Marine models.

For the tabard, I start with a basecoat of GWS Steel Legion
Drab. This is a great brown color that every painter should have handy—it’s a
cool tone, but mixes well with every other brown in pretty much every range.
Games Workshop used to call it Graveyard Earth. I also tend to use it very
heavily when basing my models. I also apply this to the purity seal, and to the
chapter icon on the shoulder pad. On the tabard, I take care to avoid the
sculpted sword.

Virtually none of the previous step will show in the final
product. The reason to apply the brown first is to create a smooth, lighter
surface with an appropriate colored shadow to put the lighter colors on
afterwards. So now, I apply a layer to everything from the previous step, using
RMS Aged Bone.

Now, I apply another layer of RMS Polished Bone, blended
towards the recesses.

This then gets glazed with a mix of Agrax Earthshade.

Finally, a layer of Polished Bone gets added as a final
highlight. I then applied Khorne Red to the sculpted line at the bottom of the
tabard.

For the metal components, I start with a basecoat of Vallejo
Model Color (VMC) Oily Steel. The brass areas get a coat of the
appropriately-named VMC Brass.

I apply a wash of Nuln Oil to the metal areas, and a 50/50
mix of RMS Red Ink and Brown Ink to the brass areas.

I then clean up the cords, applying black and then a
highlight of GW Eshin Grey. I also dot the barrel of the plasma pistol with
black, and draw a few lines on the purity seal while I’m at it. I also apply a
highlight of GW Dawnstone to the sword on the center of the tabard.

While I’m waiting for everything else to dry, I do the face.
I follow the progression in the How to Paint Faces article I did a couple weeks
ago. [http://ritesofbattle.blogspot.com/2012/10/boltguns-brushstrokes-painting-faces.html]
To finish things up--
The gold areas get a highlight with VMC Gold. Then both the
metal and the gold areas get a highlight of GW Runefang Steel. I pick out the Chapter icon on the shoulder pad in white,
and then apply a layer of white to the coil on the plasma pistol. I then apply a wash of RMS Blue Ink to the plasma coil.Finally, I’ll add a layer to the red areas with RMS Carnage
Red, and then apply an edge highlight of Carnage Red with a touch of RMS Desert
Tan mixed in.
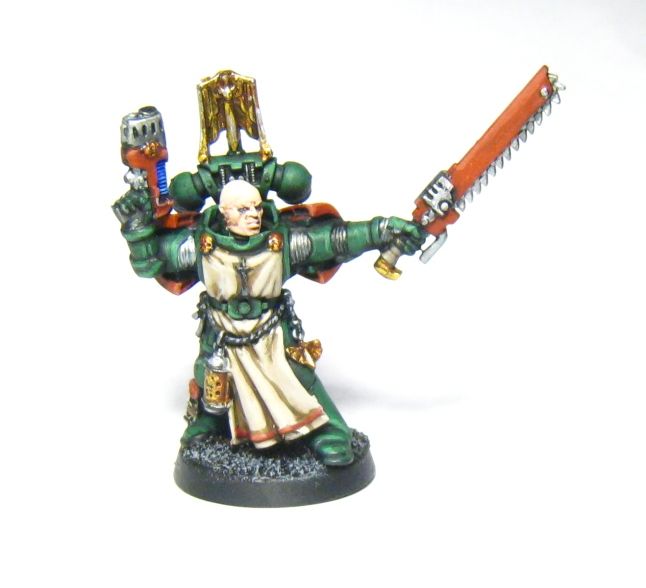
After basing the model, this is what we end up with.
No comments:
Post a Comment